Front Wheel Bearing Replacement (4WD, Automatic Free-Wheeling Hub)
Replacing the front wheel bearings on a 4WD L300 / Delica Star Wagon with automatic free-wheeling hubs, converted from the factory service manual — includes the exact bearing preload sequence, which is easy to get wrong.
- Manual section
- Group 26 — Front Axle (4WD)
- Manual pages
- 26-26 to 26-32 (4WD, automatic free-wheeling hub)
- Applies to
- L300 / Delica Star Wagon, 4WD, automatic free-wheeling hubs. Manual hubs use a simpler cover, not covered here.
Tools needed
MB990628
snap ring remover
MB998360
automatic free-wheeling hub removal tool
MB990954
lock nut socket
MB990939, MB990938, MB990935 (or MB990925)
bearing outer/inner race press tools
MB990955
oil seal installer
Spring scale (for turning resistance measurement) and a dial gauge (for end play / drive shaft axial play)
Before you start
Removing the caliper is part of this job — do it with the brake hose still connected and wire the caliper up to the upper arm so it isn’t hanging on the hose. Don’t twist the brake hose while it’s suspended.
Torque specifications
| Fastener | Nm | ft·lbs |
|---|---|---|
| Caliper mounting bolts | 80–100 | 58–72 |
| Brake disc to front hub | 50–60 | 36–43 |
| Auto free-wheeling hub cover | 18–35 | 13–25 |
Removal steps
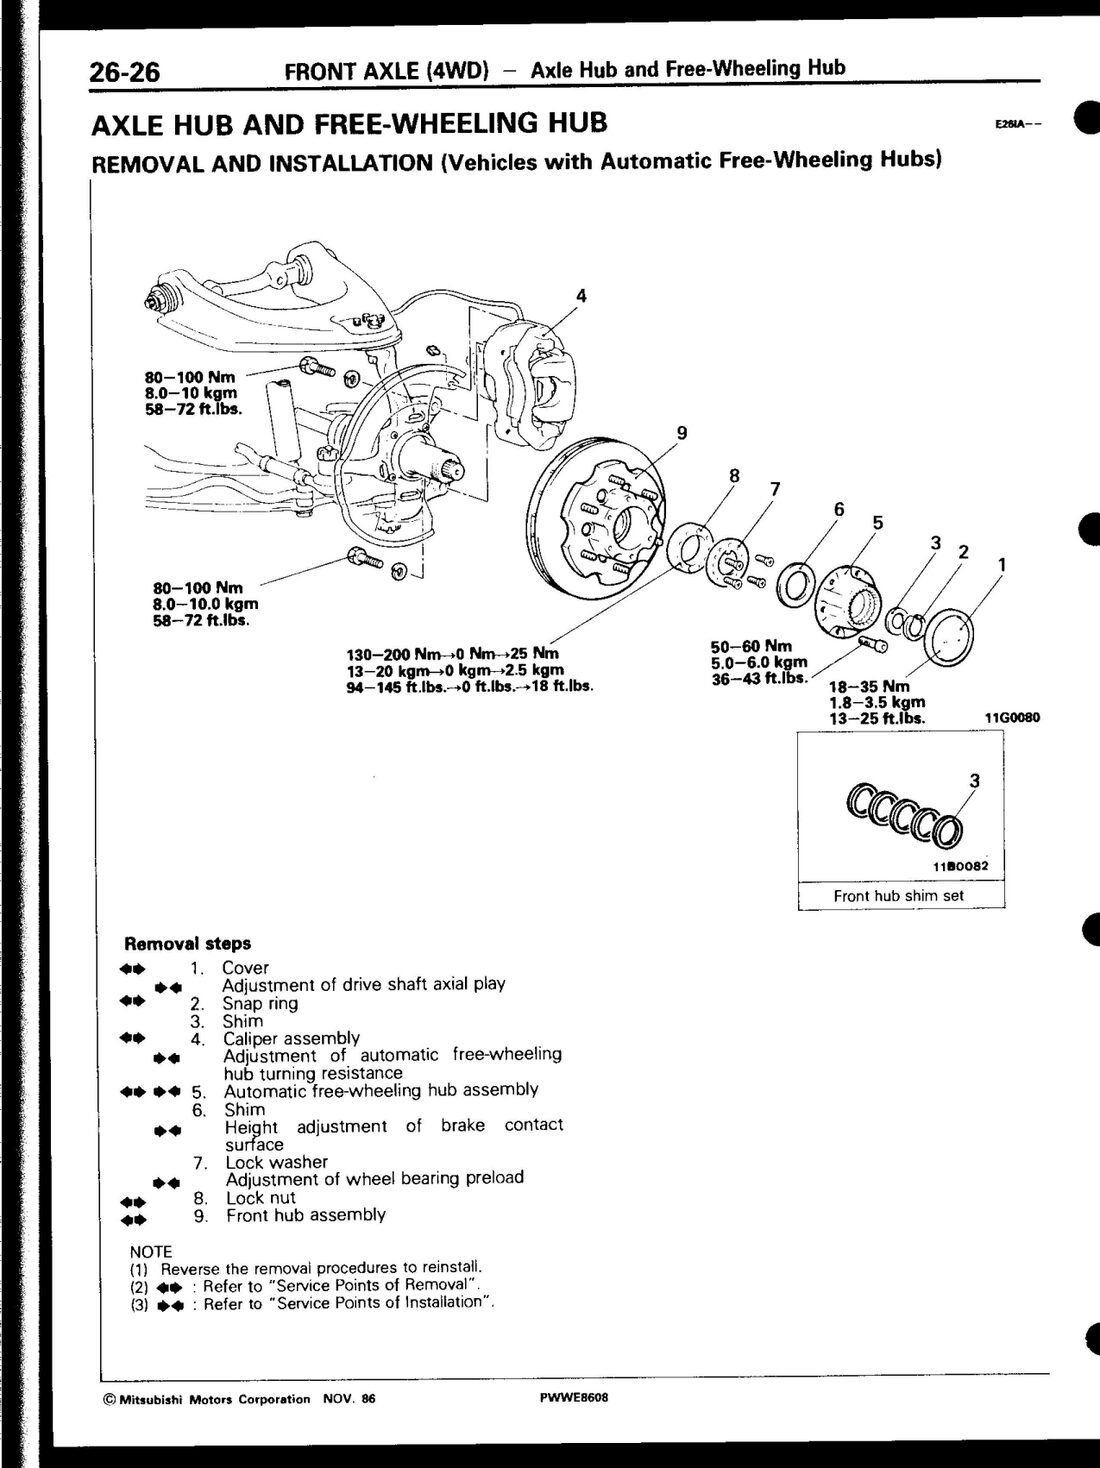 Factory service manual (PWWE8608), page 26-26.
- Set the free-wheeling hub to the free condition (shift the transfer to 2H, reverse 1–2 m), then remove the hub cover — use an oil filter wrench with a protective cloth if it won’t loosen by hand.
- Remove the snap ring from the drive shaft.
- Remove the shim.
- Remove the caliper assembly, brake hose still attached, and wire it up out of the way.
- Remove the automatic free-wheeling hub assembly with the removal tool (MB998360).
- Remove the shim underneath it.
- Remove the lock washer.
- Remove the lock nut with the lock nut socket (MB990954).
- Remove the front hub assembly from the knuckle, together with the inner and outer bearings. Don’t drop the outer bearing’s inner race — it’s loose once the hub comes off.
Inspection
- Check the wheel bearing for seizure, discoloration, or a rough raceway surface.
- Check the front hub for cracks.
- Check the oil seals for cracks or damage.
- Check that the brake disc and front hub bolts aren’t loose.
- Check there’s still grease in the inner front hub.
Bearing replacement (hub disassembly)
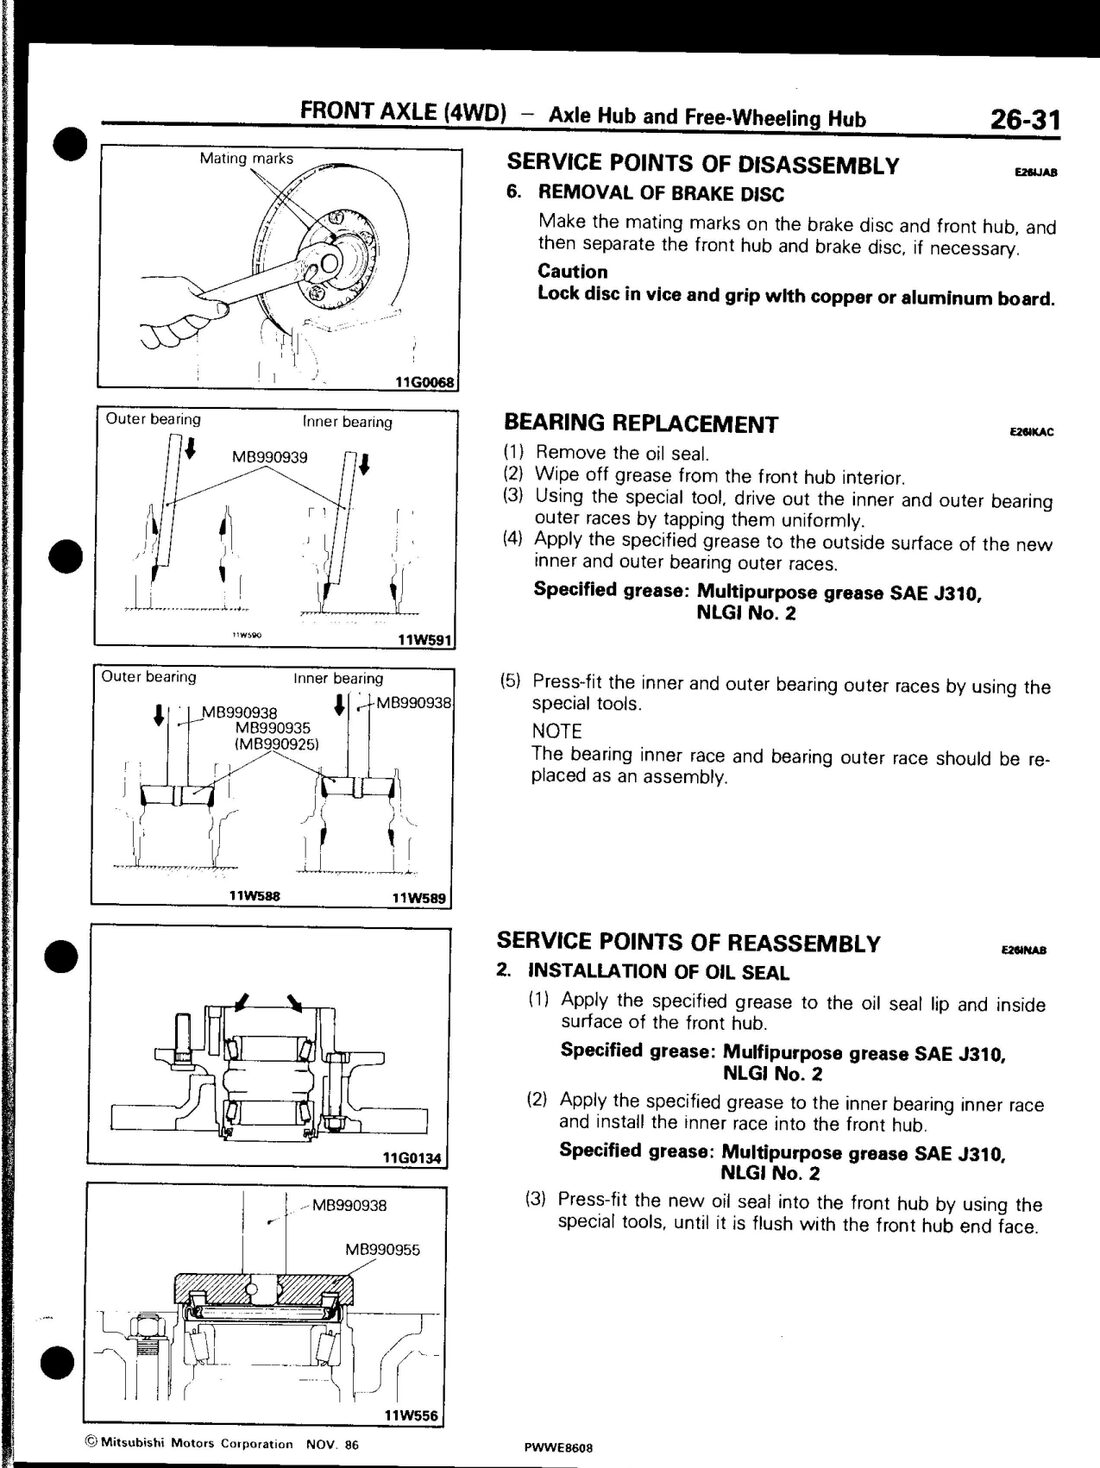 Factory service manual (PWWE8608), page 26-31.
- Remove the oil seal.
- Wipe the old grease out of the hub interior.
- Drive out the inner and outer bearing outer races with the special tool, tapping evenly around the circumference so it doesn’t cock sideways.
- Grease the outside surface of the new inner and outer bearing outer races with multipurpose grease (SAE J310, NLGI No. 2).
- Press the new outer races in with the special tools. The bearing inner race and outer race are replaced as a matched pair, never mixed old/new.
Reassembly: grease the oil seal lip and the hub’s inside surface, grease the inner bearing’s inner race and seat it in the hub, then press the new oil seal in flush with the hub’s end face.
The wheel bearing preload sequence — the part that’s easy to get wrong
This isn’t a single torque value — it’s a tighten/loosen/retighten sequence, then a measured check. (A second manual excerpt gives the initial tighten as 127–196 Nm rather than 130–200 Nm — the ft·lbs figure, 94–145, is identical in both, so this reads as a rounding difference between print runs rather than a real disagreement. Either Nm figure lands you in the same place.)
- Tighten the lock nut to 130–200 Nm (94–145 ft·lbs).
- Loosen it fully to 0 Nm.
- Retighten to 25 Nm (18 ft·lbs).
- Loosen the lock nut approximately 30–40° to set the hub’s turning resistance and axial play.
- Check against these standard values:
- Turning resistance: 0.3–1.3 Nm (spring scale reading 5–18 N)
- End play: 0.05 mm or less
- If the measurements are outside spec, adjust the lock nut position and recheck. If you can’t get it into spec at all, the bearing is likely installed incorrectly — check it and the lubrication before assuming the bearing itself is faulty.
- Fit the lock washer. If its tabs don’t line up with the lock nut’s holes, loosen the nut slightly (no more than 20°) to align them — don’t force it on misaligned.
Reinstalling the free-wheeling hub
- Coat the free-wheeling hub body and front hub contact surfaces evenly with sealant (3M ATD Part No. 8661 or 8663) — no excess on the outside surface of the hub, it’s cosmetic-visible and can attract dirt.
- Align the brake (B) key with the knuckle spindle keyway and loosely fit the hub assembly, then push it lightly against the hub proper and turn it until it seats fully.
- Re-measure turning resistance after fitting the free-wheeling hub and subtract the reading you took before fitting it — that difference is the free-wheeling hub’s own turning resistance. Limit: 1 Nm (spring scale 14 N). Over that, pull it back apart and reassemble.
Drive shaft axial play
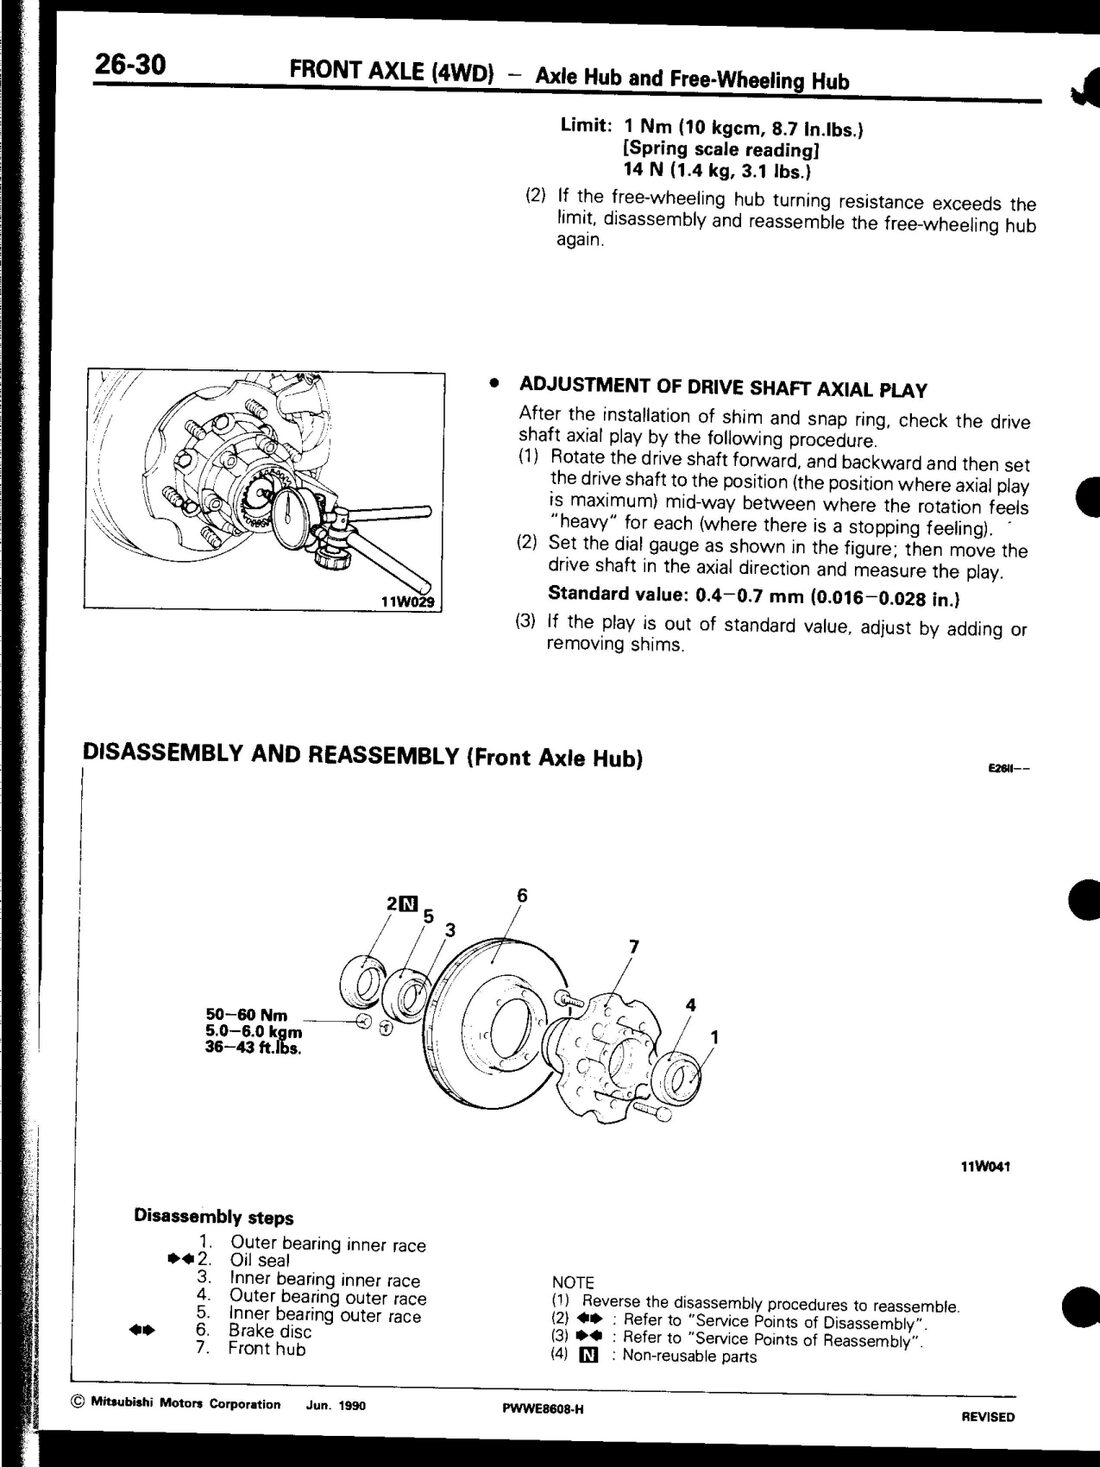 Factory service manual (PWWE8608), page 26-30.
After the shim and snap ring go back on: rotate the drive shaft forward and back to find the position where it feels “heaviest” for each direction, set it midway between those two points, then measure axial play with a dial gauge. Standard value is 0.4–0.7 mm — add or remove shims to bring it into range.
Brake contact surface height
Measure at two points with a depth gauge. Standard value: 11.7–12.3 mm. If the average is out of spec, correct it with shims — this affects how the auto hub’s internal brake mechanism engages, not the wheel brakes.
Converted from the Mitsubishi factory service manual (document PWWE8608), Group 26 — Front Axle (4WD), automatic free-wheeling hub section, printed pages 26-26 to 26-32. Internal disassembly of the free-wheeling hub mechanism itself (drive gear, slide gear, cam) is a separate, deeper job than a bearing swap and isn’t covered here — only pull it apart if the hub mechanism itself is suspect.
Last updated 2026-09-23.